Single sign-on (SSO)
Smartlook supports single sign-on (SSO) using the SAML 2.0 protocol. SSO allows members of your organization to access Smartlook using the identity provided by your SAML identity provider.
SSO configuration
To configure SSO, you need the metadata of your SAML identity provider and access to your identity provider's configuration in order to upload Smartlook's SAML metadata. If you want to know how SAML works or need to brush up on these terms, you can read our overview of SAML at the bottom of this article.
In your Organization settings, click Single sign-on (SSO).
You can choose from 3 ways of uploading your SAML identity provider's metadata into Smartlook:
- Providing the URL of your metadata XML file
- Uploading the contents of your metadata XML file
- Manually uploading the metadata fields required by Smartlook
If possible, we recommend that you provide the URL of your identity provider's metadata XML file. This can be done by clicking the Set metadata URL button in the Configuration section. If you provide the URL, Smartlook can automatically renew your metadata in case it expires and, you'll not have to worry about it disappearing. In case the renewal fails, we'll let you know by email.
You can also upload metadata file contents by clicking the Upload metadata button. This way, we cannot automatically renew your metadata, but we'll let you know by email so that you can upload a new version.
You can check which metadata URL, if any, we'll be using and for how long your metadata will be valid in the middle of the Configuration section of your SSO settings page.
In case neither of the 2 methods above are applicable, you can manually fill in your metadata. You'll need to fill in the entity ID (sometimes known as the issuer), both login and logout endpoints, and add at least 1 certificate of your SAML identity provider.
To finish the configuration, the domains of your organization's members' emails will be required. Please fill in at least 1 email domain that members of your organization use into the Domains section. Please bear in mind that all users that enter email addresses with the domains you provide will be redirected to log in at your identity provider.
The only thing that's left to do in Smartlook is to turn on SSO for your users by clicking the toggle at the top part of Configuration section. Now, in case you haven't already configured Smartlook on your identity provider, you'll need to either download Smartlook's metadata file or copy its link. It can be found at the top part of the SSO settings section. Information about how to set up Smartlook SAML SSO with a few common identity providers can be found in the next section. After this last step, your single sign-on should be fully configured and working.
When SSO is turned on, all members of your organization have to use SSO for login and registration purposes. However, admins can still log in via email and password. This means that if you make a mistake when configuring your single sign-on or your metadata expires, your admins will still be able to access Smartlook and fix any issues.
Configuring Smartlook SAML for common identity providers
Okta
Smartlook has an official Okta integration in the Okta Integration Network. Follow Okta's documentation on how to add this application to your organization. Using the official Smartlook application is the easiest way to use Smartlook SSO with Okta.
Azure
To connect your Azure AD identity provider with Smartlook follow this guide to configure our official Azure integration.
SAML 2.0 overview
Security Assertion Markup Language (SAML) 2.0 allows organizations to manage identities that their members use to log into services they need. This means that your organization has complete control of users' accounts and identities in your Smartlook organization.
How SAML 2.0 works is displayed on the following diagram:
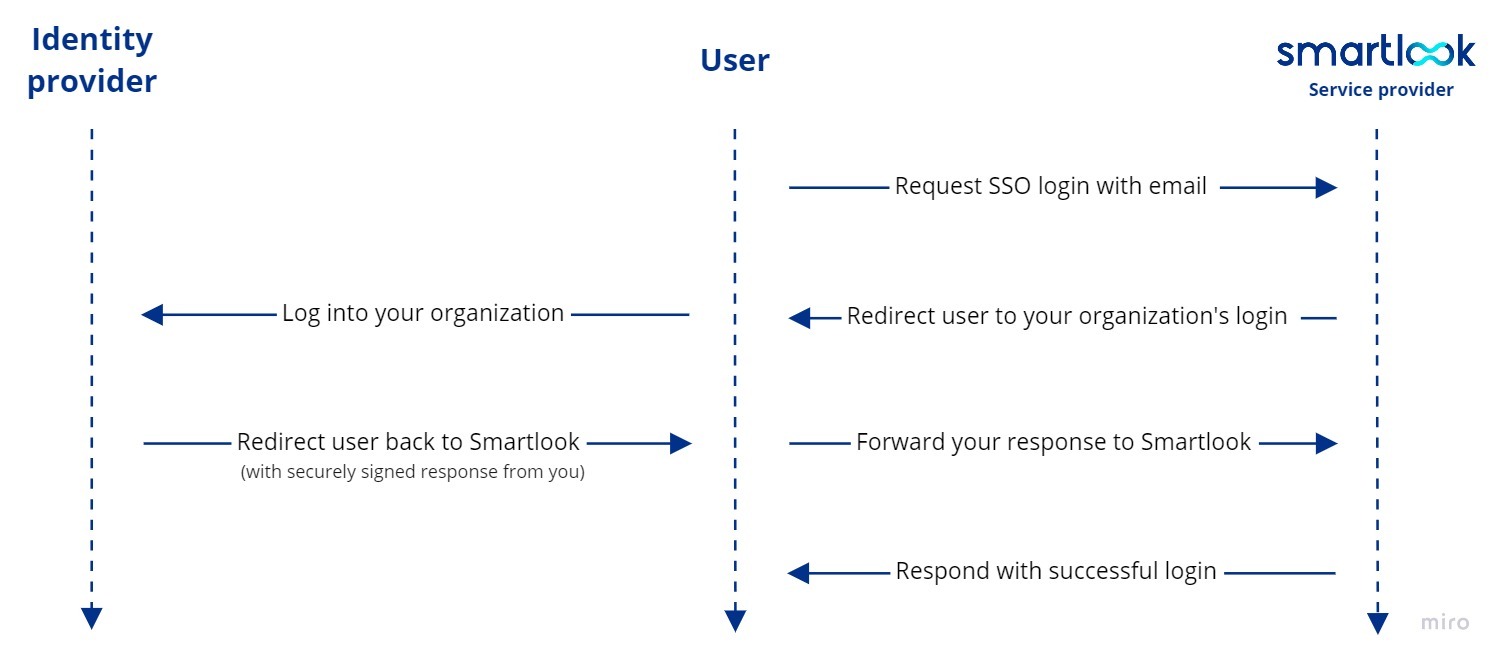
In SAML, the parties known as the identity provider, are those who manage the identities, and the service provider, are those who provide the service that users administrated by the identity provider consume. In our scenario, you, or your authentication service, are the identity provider and Smartlook is the service provider.
As a user, you must first request SSO login in Smartlook by pressing the Company login button on Smartlook's login screen. This takes you to the SSO login screen, where you enter your company email address. Smartlook then matches this email to the SSO configuration of your organization and redirects you to your company's login portal. After you log in, the browser redirects you back to Smartlook which receives the authentication result from your identity provider and can use this to log the user into Smartlook as well. Since, we know which organization you belong to, we'll also automatically assign you to your Smartlook organization.
FAQ
Q: What happens if we add new user to our identity provider? Do we have to create the new user in Smartlook as well?
A: The new user account will be created automatically by Smartlook when the user logs in for the first time. However you can invite this user via email to make sure they're assigned to correct project once they log in.
Q: Is encryption required for your SSO service provider?
A: Yes we require SAML response encryption.
Updated 11 months ago